Friday 20 September 2013

Dehydrated Watermelon (or, how I found out that watermelon can be candy)

As mentioned, I've been experimenting with my Dehydrator a lot this summer. In fact it's running weekly, sometimes more often depending on what I have laying around. I've especially been fond of doing celery, leeks, onions, apples, and pears. 

Although I am not the biggest fan of watermelon in the world, I'd heard that it becomes particularly sweet when dehydrated. Since it's mostly water, it makes a lot of sense that it would become a much stronger flavour when all that water was taken out. 

So, much to the chagrin of my husband (also not a watermelon fan), I bought a huge watermelon and promptly carved it apart.

I sliced the watermelon into 1/4 inch slices and filled all 6 trays of my dehydrator, and set it at 135F

Being that it's all water, I knew it would take a long time to dry. It took me 19 hours to dry this batch, and it probably needed another hour or two. I've noticed pieces sticking together in the jar, so they definitely have a bit of moisture left, but I wanted to avoid them becoming too brittle.

They are pretty tasty! They really do taste like a condensed version of a watermelon, incredibly sweet. I tend to refer to it as "watemelon candy" due to it's sweet taste and candy-like texture. And the watermelon lovers I've given some to really love it! 
Mmmm, watermelon candy

Monday 16 September 2013

I Love Canning: the Pickle Chronicles

What a great summer it's been! I hope you've been keeping busy with the harvests in your own areas. We've been sampling all sorts of local goodies this summer. Some of them I've dehydrated - more on that, soon - others I've canned.
What weird and wonderful things are brewing?

Water bath canning is a stand-by for a lot of things I preserve over the summer. I also do several items in a pressure canner. But there is one thing I had yet to do well....

Make crispy pickles.

It seems like a funny thing, but it had always eluded me. Between not being able to bear adding the full salt content for a pickle recipe, I just couldn't bring myself to adding chemical pickle crispeners. Last time I made pickles, they were a soggy mess.

It started with a trip to the market where I not only bought a 1/2 bushel of pickling cucumbers, but the biggest "tree" of dill I could find. Dill is one of my favourite flavours, so I like my pickles to be full of it.

I've literally hacked off half of the Dill "tree" at this point
Next step.... Clean all of the cucumbers, slowly dismantle the dill, and trim the ends off of them. At this point it will serve you well to bribe a friend with future pickles to help you out. And recruit your husband. We opted to brine our cucumbers over night so the three of us were up well into the night, slicing the ends off and tossing them into the brine.

This is one of many bowls we trimmed that night
We used a well cleaned camping cooler to hold all of the finished cucumbers in brine. We also added a few bags of ice, and held the cucumbers under water with a couple of dinner plates. This was left to sit for around 16 hours before we finally got around to canning them.

Finally we got around to canning the pickles.

Each jar was given:
  • 2-3 cloves of garlic
  • 2 heads of dill
  • mustard seeds
  • 2 grape leaves
  • cucumbers
  • pickle brine
I'd heard somewhere that grape leaves help to keep pickles more crisp, and with them available so nearby at a local grocer I thought I'd give them a try. Besides, they look awfully nice in the jar.


Food should look pretty and be functional

Et Voila!! Pickles.

It's actually been a few weeks since we made them, and I finally cracked open a jar. I had to know if the grape leaves made a difference, AND IT DID. Like a boss. The pickles are delicious and crisp and I'm looking forward to eating them all winter.


Wednesday 31 July 2013

Making camp food: Lentil Soup

We used a recent camping trip as an excuse to dehydrate some of our meals for the trip. One of the things we dried was brown rice. It takes a fraction of the time to rehydrate and heat the rice than it does to cook it from scratch. We threw some dehydrated veggies in with our rice as it rehydrated and we had a great, warm dinner on a rainy night.

Still, my favourite was lentil soup.

I love making lentil soup. I'll eat it thick as a stand alone dish, or make it a bit thinner and add vegetables and eat it like a stew. Lentils are also an incredibly healthy food, they are high in protein and have a low inflammation factor (IF) rating and score on the glycemic index.  It's also a great source of iron and dietary fibre.

And it's delicious. Have I mentioned how great it tastes?

Step 1: Make lentil soup. I made the soup slightly thicker than I normally would, thinking that it would just save time in the long run as the dehydrator would only be removing all of the water in the soup anyway. The soup was seasoned well. You'll find all kinds of lentil recipes on the internet, but it's a pretty easy ingredient to cook with on the fly. The only rule of thumb here is to keep the fat content low since we're going to be dehydrating the soup. In this case I didn't use a stock as the base, rather I used seasoning, onions and the lentils themselves for flavour.

Step 2: Put the lentil soup in the dehydrator. This is where the extra fruit "roll up" trays I bought came in handy. They can be used to dry all kinds of liquids. Spread the soup on the trays as evenly as possible. The edges can be slightly thicker since they tend to dry faster. The lentil soup should be about a 1/4" thick. I believe I dried the soup at 140 overnight.
Step 3: Marvel at the amazing thing you've created. The pieces were bigger than what's shown in the pictures, I broke them up in order to store it better. The lentil soup came out almost cracker like. In fact, I ate a couple of dried pieces and I think it really would make an excellent cracker if I could fine-tune the recipe.  Seal all of the pieces in an air-tight bag or jar.


Step 4: Enjoy a hot cup of previously made lentil soup. We enjoyed this when we were camping, and I rehydrated it with several vegetables which made a hearty soup. With the high protein content, we didn't need to add meat to the meal.  It took about 10 minutes to rehydrate, and I just kept adding water until it had the right consitency.

I'll do this again, even if we're camping somewhere that food is readily available. The resulting meal is delicious and healthy, not to mention completely satisfying. It took almost no room in our camping gear, and dried while we slept.

Have you tried any soups in a dehydrator? I'd love to hear your stories.

Thursday 6 June 2013

Dehydrated Tomatoes

Just a quick update about the dehydrated tomatoes we recently made.


Tonight I put a generous cup or so into the Magic Bullet and it powdered up beautifully! Obviously I've got them dry enough. What struck me was the smell, it almost smelled like the intense tomato smell you get when you've simmered some down for a while.

I added water to it bit by bit until I had a nice thick tomato sauce, and all the dehydrated tomatoes had enough water to rehydrate. Added seasoning/herbs right to the mix as I blended it.

The result was a great tomato sauce that I've used for a casserole. It was so fresh and delicious I could have eaten it the way it was. I would assume that if I kept adding water I could have made a cold tomato soup with it.

I'm definitely dehydrating tomatoes as much as I can over the summer. Not only will it be a great addition to camp foods, but to our cooking over the winter and early spring when the fresh tomatoes are hard to find locally.

We bought a few more trays for the dehydrator. I'm wondering how many I can add to the tower before the air just can't get around everything effectively?

Sunday 2 June 2013

Adventures in Dehydrating

A little over a week ago, we bought a dehydrator. Dehydrating is new to me, but something I've wanted to try for a while. It's a fantastic way to preserve food, which makes a nice addition to what we already can and freeze. Also, I love some dried fruit. I find it much easier to eat dried apples than a whole apple while working at my desk.


I started with some pears and apples. We used fantastic organic pears and apples, and left the skin on (just cut out the cores). We sliced them on our mandolin, abour 3/8" thick.

Have I mentioned I love our mandolin?

The celery was our first vegetable. What you see in that jar above is one bunch of celery. Again, sliced on the mandolin after a good washing, no blanching required. We left the celery on overnight at 125 and it was perfect in the morning.  Another vegetable we did this week was carrots. Those I steamed for 5 - 6 minutes after slicing them on the mandolin. Left them overnight but found they needed a bit of extra time the following day.

Finally, tomatoes! The dried tomatoes have a great taste, I can't wait to cook with them. Roma tomatoes work really well. We probably sliced ours slightly too thick, they took longer than expected. But we did slice them in a manner that they sat skin side down, which really helped to keep the tomato intact and from sticking to the trays.

A before and after:

My week's worth of dehydrated goodies. 


I'm trying my hand at some date bars with seeds and nuts tonight. At the very least I have some tasty nutty/seedy goo to eat on.... something. But if these work out, expect another update soon.

Bacon. Butter. Tart.

It's a bit overdue, but I've meant to post about this monstrously delicious treat we had last month.


Butter tart, meet Bacon. 


I know it's trendy to put bacon into just about everything now, but I'm still exploring the world of bacony sweets. Always enjoyed the taste of bacon when, in a morning breakfast, it would mix with some maple syrup. I've added maple syrup when its cooked before to carmelize it. Yet still, I would never have considered adding it to a butter tart!

We were visiting the Green Living Show in Toronto this April when we tasted these fabulous treats from Madelyn's Diner (Stratford, Ontario).

One of my favourite part of the Green Living Show is the food vendors! We discover something new every year we go. We've bought so many delicious snacks, sauces and goodies there. Many of the vendors have samples available, and it's allowed us to try some really interesting things - from sweets to super foods to vegan entrees.

This year we found a large bag of fairly local (Peterborough?) hemp seeds which were super fresh. We'd been eating the ones bought from a bulk section. These fresh, refridgerated seed are delicious!! In hindsight I wish we'd bought another bag. We eat them every day on oatmeal and add them to salads. And since most items are on a show special, we got them for a better price than we'd been buying the stale ones at.

There is also a food court, with foods and drinks from several local regions. We always buy a handful of tickets and try a few different treats. This is where we found out bacon butter tarts. We ordered one each to take home.

It was.... good! Odd, but good. I'm still not convinced bacon should be in sweet treats, but it's remarkably delicious. The pieces of bacon were thick enough to really keep their definition, otherwise I'd worry that they would begin to meld into the mushiness of the filling. The actual sweet filling for me was slightly too sweet, but it didn't sound like that was an issue for my hubby with a sweet tooth.

My stomach did not thank me later, however. Between the sugar and fats, this is definitely a once in a blue moon kind of treat. Kind of a novelty food, really.

But - bacon. So it's a win.


Thursday 30 May 2013

Campfire food

Something we've wanted to try for a while was to try cooking in a dutch oven on a campfire. We love to camp, and we love finding new versatile ways to cook while we spend our time outdoors.

The dutch oven we picked up is about 9" across if I had to guess, more than enough for the two of us. We picked it up at a local surplus store, along with a handle for picking up the lid (note - that's an important piece of kit for this project! As were a pair of leather gloves we brought along).

Cooking with a Dutch Oven in Camp

When looking for a cast iron dutch oven, you want to find one with a sunken lid rather than the domed versions we buy for stove top cooking. The idea is that you'll be placing coals on top of it to evenly distribute the heat. The handle should be all part of the cast iron lid. Ideally you want to find one with legs. We didn't. We've considered a few fire stones to set it up on if we find food starts to burn, but we haven't found ourselves having a problem with it yet. 

You want to have a pile of hot coals to work from. A lot of people buy charcoal, but we made coals in camp. Cut the wood into smaller pieces for a quick burn and you'll have a pile of hot coals in no time. I used a camp shovel to remove a good pile of coals, placed the dutch oven on a bed of slightly thinned out coals (so it wasn't too hot), and put the shovel full of coals on top. Quick note - make sure the lid of your dutch oven is closed just right before doing this to avoid any ash in your food.

Delicious Camp Food on a Rainy Day

Our first adventure with the dutch oven while camping was in Algonquin Park a few weeks ago. I wasn't sure how long it would take to make coals, so we waited until we had a full day in camp to get the fire going. In the morning we headed out to looking for moose (we saw seventeen of them that weekend) when it started to rain early in the morning. We spent a few hours out of camp before returning, stopping by the visitor's centre to check the weather. Thunderstorms expected all day. We headed back to camp, sure that our dutch oven plans had been rained out in the deluge.

It actually wasn't bad in camp! The large white and red pines provided a good canopy, and our camp gear made it comfortable and dry. My husband decided to set to work on the fire. We had a few bags of wood we wanted to get through that night, since we were leaving the next day. He managed to get a fire going, and with all the small pieces we got a great hot fire, followed by some perfect coals.

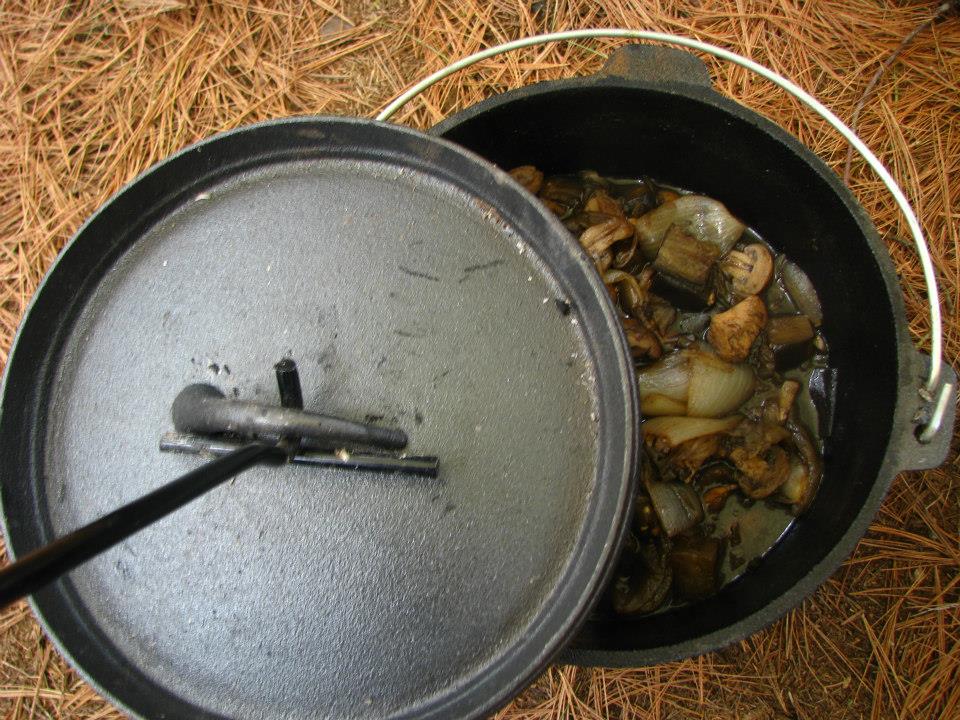
The rain slowed and actually stopped. I grabbed all the pre-chopped ingredients, got dinner together and less than an hour later we had a delicious hot stew to warm us up. I didn't snap a picture of it on the coals, unfortunately. The pot lifter really was the best way to get in and out of it, and our pair of leather gloves were practically indispensable. 

I used eggplant, sliced garlic, raw and carmelized onions (I'd done ahead at home), cooked chicken and mushrooms. A little seasoning, adjusted again near the end of cooking. Just threw them into the dutch oven until it's filled to the top (the eggplant really cooks down). Topped it off with an entire can of Scottish Ale and about a shot glass full of portabello mushroom powder (I love portabello mushroom powder! You can dehydrate and grind them to make your own or find it in some stores). We got a fantastic mushroom/chicken/eggplant stew.


Dutch oven gets a permanent spot in our camping gear. I'm planning some other baked goodies (brownies, anyone?) later this summer.

It's cast iron, so normal rules for taking care of your cast iron apply.

I tend to look up recipes for ideas before heading off on creating my own meals. When looking for some dutch oven campfire recipes, I was surprised how many of them use processed ingredients. A lot of baked bean recipes were literally cans of baked beans, flavoured, then heated in the dutch oven. It was kind of disappointing!

It didn't take much work for me to make a meal with fresh ingredients. We cooked the meal at home, cleaned and chopped up the veggies. For longer trips, we'll use dehydrated veggies, too.  If I'm supposed to be able to make anything in the dutch oven on the campfire that I could at home, we have some serious adventures in dutch oven campfire cooking ahead of us.

Tuesday 29 January 2013

Roasting duck

Although I've enjoyed duck in a myriad of ways, I've never actually cooked any myself. Today I took a shot and roasted an entire duck, and used made a personal goal of using as much of the bird as I could.

One whole bird. 

First step, like any time you'd cook whole poultry, take a moment to see what goodies you have inside. Now, I've been guilty in the past of discarding all of these little treasures when cooking poultry, but I'm determined to use it all. Found inside today's duck: neck and liver. Set aside. In addition, you can remove the large flaps of extra skin on the bird to retain and draw more fat out of later.

Rinse the bird inside and out. Pat skin completely dry. I've seen someone post that they've actually used a hair dryer to dry the skin perfectly. The more dry the skin, the crispier your skin will be. I patted dry with paper towels. The skin is crispy, but I have to admit I'm curious about how much drier (read: crispier) I can get it. Season the cavity of the bird with salt.

Time for the roasting pan. The key here is making sure your duck is off the bottom of the pan, on something which will allow the grease to drip off. In my case, I pulled out our broiling pan and roasted the duck (uncovered) on that. Duck is a fatty bird. Specifically, if you take a look, you'll see a rather thick later of fat directly under the skin. Our goal when roasting the duck is to get as much of that fat rendered down as possible. The outcome is a delicious and decadent fat you can use in cooking later on. I have my sights set on duck fat roasted potatoes....

To help the fat get out, and the skin crisp up, I used two methods. First, score the skin before roasting. I scored a diamond pattern all over the breast side of the bird. The idea is to cut through the skin and a bit of fat, but not the flesh. I'll admit I went a bit deep a few times, but it was quite easy when I got the hang of it. The second method will be poking through the flesh and fat of the bird throughout it's cooking time, to release the grease building up under the skin.

Time to roast the bird. It's dried and scored. Season with a little salt, place breast side up and stick it in the oven. 300F The technique I used was to roast it an hour, prick the skin to let grease escape, flip it and repeat. In hindsight, I'd only have it on it's breast for one hour near the beginning, some of the skin ended off coming off on the broiling pan. Disappointing, but I saved most of it. However, no pictures of perfectly roasted duck for you this time.

When the bird is pretty close to being done, the fat is mostly rendered and the meat is cooked, turn the oven up to 400F for 5 - 10 minutes. If you choose to glaze the bird, you'll want to remove all of the fat from the bottom of your pan so it doesn't get glaze in it, then glaze the duck and return to the oven for another 5 - 7 minutes at the same temperature. Eat. Delicious. Crispy. Must do this again.

Afterwards I was left with the bones of the duck, the neck and liver. The neck and bones I immediately put into a pot and started to make stock out of it. It's simmering now, and smells fantastic. I took the extra pieces of skin and cooked them in a saucepan with a little water in it. Slowly I was able to render out quite a bit more fat from those pieces.

 Duck liver. I'm not a huge fan of liver, but I thought I'd give cooking it a shot. I used the oil made from the pices of skin at the end, let it brown just a little bit, then tossed in a handful of finely chopped onion. Cooked the onion in the fat until they were soft, then added the duck liver (cut into smaller pieces) and minced garlic. When its all cooked, I seasoned and pureed it. Should be great on crackers.

So that's it. How I used an entire duck today, and now it's dinner time!!

Thursday 14 October 2010

Pumpkin Hunting

Over our Canadian thanksgiving weekend, my husband, brother and I were on our way to my mother's for thanksgiving dinner. Since it's a town over, it not only gave us an opportunity for a leisurely fall drive but a trip to a favourite farm that carries many varieties of that famous October squash: the pumpkin.

One of the reasons that I really enjoy having our Canuck Thanksgiving celebration in mid-October is because of how intensely autumn has descended upon us at that point. This year, the weekend was beautiful and bright coloured leaves were falling from the trees. Our detour took us to a childhood favourite, Strom's farm, known for their sweet corn in the summer. Strom's also provides a very large children's outdoor play area, corn maze, pick your own popping corn (right off the stalk!), a bakery, and more. Yes, you can even have your birthday celebrations there. It's located just outside of Guelph (Ontario), on Wellington rd 32, between highway's 24 and 7. I have fond memories of eating Strom's sweet corn as a young girl, when my best friend worked on their farm over the summers. Still to this day, when I bring something to my mother that says "Strom's farm" on the bag, my mother lets out a bit of an excited noise.

A plethora of smells hits you when you first get close to the farm store. Inside, they are working away to bake pumpkin pies, apple crisps, apple pies and other treats. Outside, hot apple cider is waiting for you. We bought a few kinds of pie to take back to my mother's house for thanksgiving dinner (again, she made that excited noise). I picked their pumpkin pie and happily enjoyed it that evening. I'd say it's probably my current favourite store-bought pumpkin pie. It doesn't need whipped cream, it is that good. Then again, I'm a bit of a pumpkin pie freak. I love pumpkins.

Not surprisingly, one of my favourite things about visiting Strom's in October is that there are pumpkins strewn about as far as the eye can see. Anyone can find the right Hallowe'en pumpkin here, as well as many varieties for pies and cooking. They have more types of pumpkins that I'd like to admit I even knew existed (11 types of pumpkins this year). You can go out to the fields to pick your own, or choose from the hundreds they've made available at the store. They offer gigantic pumpkins, up to 60lbs, that one year I am determined to buy and turn into an epic jack o'lantern. There are also your standard pumpkins, pie pumpkins, and other small eating-types. My favourite section is the section of "gourmet" pumpkins, in some of the oddest colours and shapes. A friend bought a pure white pumpkin there last year, perhaps a Casper variety pumpkin. This year, my husband and I picked up a Jarrahdale pumpkin, which is actually a blue coloured pumpkin that looks like a blue-grey colour. It's going to make us an excellent jack o'lantern this month (post to come...)

By the time we were done, our little wagon (provided by Strom's) was filled with pies and pumpkins. In addition to our soon-to-be-halloween-decoration, I picked up a few of the sweeter pie pumpkins to cook and keep over the next few month. I love pumpkin soup, or just a plain pumpkin mash. Mmm.... pumpkin.

For the record, this year I have managed to find two separate uses for pumpkin puree that are new to me. The first is a knock off of Starbuck's Pumpkin Spice Latte which is not only cheaper to make at home, but tastes better since it uses pure ingredients rather then chemically produced flavours. The second use, oddly enough, is feeding it to our cat. Little known fact - pumpkin puree in a cat's food helps them with constipation. I can only wonder how it helps us too ;)

Wednesday 13 October 2010

As the season winds down...

Next week is our last CSA (Community Supported Agriculture) vegetable pick up. I'm having end of CSA anxiety: Did I put away enough veggies for winter? Did we let too much go to waste? Why didn't I get anything canned while the crops were being produced?

This is the third time that my husband and I have participated in a CSA season. The first year we tried, we wasted a whole lot of produce while we learned what we were doing. CSA's aren't necessarily easy things to be a part of for more urbanites. Once a week you are faced with a plethora of local vegetables, some of which you may never have seen before or which you don't cook often with. If you don't get through those, there is more coming next week, and the week after. The veggies can start to pile up, and eventually rot. It can turn people off of a CSA very quickly.

Let's be honest. Even with three years into my CSA experience, we still lose some veggies during the season. It reflects on how busy our lives are, and how much work it really is to clean and cook veggies all the time. But, like most things, practice makes us more efficient. Compared to our first season in a CSA, we lose next to nothing now. We make a point of freezing more items, and making more meals at home during the week. Sometimes we lose a few things.

I think of rotting CSA veggies as food for my composter.

So at the end of this season, I know we've done ok because we're getting better and better at it. I have food in my freezer to eat over the winter, even if it's not quite as much as I've put away last year. Maybe we're eating more of it when it's fresh, because we're not really wasting much.

CSA's offer a lot of benefits. It provides you with locally grown produce, usually harvested a day or so before you pick it up. That means very fresh produce which hasn't had much of a chance to lose nutrients. It's also almost always organic produce you get. Better for your body, and for the environment. You make a social statement when you join a CSA that you want organic and local foods, it's supporting a movement. You make a relationship with your farmer(s), and know everyone that has been in contact with your food. You can donate your time and help on the farm, contributing toward the harvest. And the constant stream of veggies means you're eating foods that are good for you too.

I encouraged my Mom to try a CSA. I wasn't sure she'd go for it, and when she jumped on the challenge, I was wary she'd enjoy it. Now, at the end of her CSA season, she is telling me how much she enjoyed it, and how she was looking forward to joining again next year. She got a small share, and made a routine for herself that weekly she cleans and processes most of her veggies for the week, and was able to keep up with most of it. My mom isn't someone that looks for organic/local foods, but it's so encouraging to see her getting benefits out of it. It's allowing her to watch the seasons, and enjoy new foods.

CSA's can be a great experience for anyone, although it takes work. I can't recommend them enough.